My experience using Xilisoft Video Converter (2. 3D Video Conversion)
To start a work, the first thing is to know the work content and the product. The following is my real feeling while trying the first product Xilisoft Video Converter Ultimate V7.
Yeah, it has been almost one month past from the day I first tried this product. But the experience feeling left clearly. Those days I felt so urgent to know all the program. As I am always keeping high interest in high tech product, especially the software. In the last blogger, I introduces how to start the program, here I will share one of its amazing features: 3D Video Conversion.
3D movie is much attractive that most young people would like to have a try the close feeling to the scene in the film, so am I.
The following valuable info was also found from the tutorial page. But the content at the bottom is my real experience.
3D Video Conversion
Choose the file you want to convert in the file list, and Click “3D Conversion” button on the toolbar to enter “3D Conversion” window.
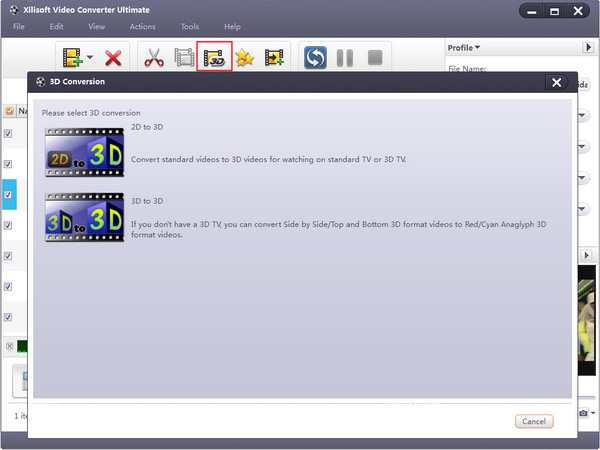
2D to 3D
You can convert 2D standard videos to 3D videos, and watch it on TV.
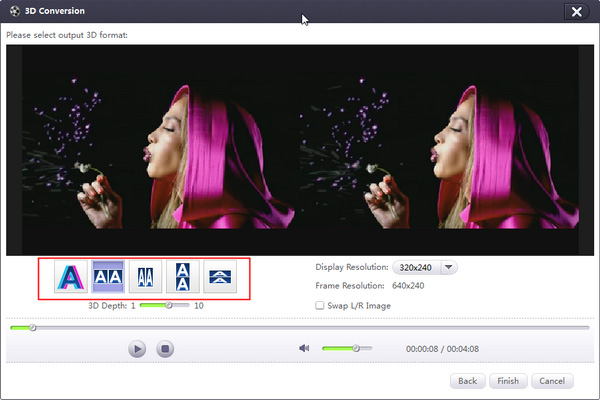
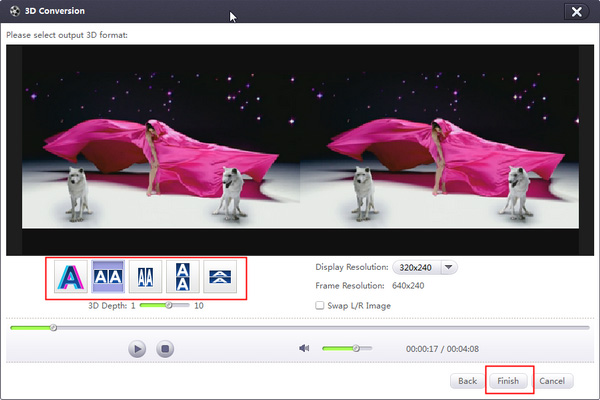
Click "2D to 3D" button to open settings interface.Click "Anaglyph (Red/Cyan)", "Side by Side", "Side by Side (Half-Width)", "Top and Bottom" or "Top and Bottom (Half-Height)" under the preview area, select an output mode.
Tips:(1) You can drag the “3D Depth” control slider to set the depth.(2) Check the “Swap L/R Image” option, you can switch left and right eye's image.Click "Finish" to return to the main window.
3D to 3D
The software supports conversion between different 3D video format.Click "3D to 3D" button to open settings interface.Click "Side by Side", "Side by Side (Half-Width)", "Top and Bottom" or "Top and Bottom (Half-Height)" under the preview area, select a source mode.Click “Next” button to return to next step.Click “Anaglyph (Red/Cyan)”, “Side by Side”, “Side by Side (Half-Width)”, “Top and Bottom” or “Top and Bottom (Half-Height)” under the preview area, select an output mode.Tip: Check the "Swap L/R Image" option, you can switch left and right eye's image.Click "Back" to return to previous step. If you click "Remove 3D Conversion Settings", then the 3D conversion will be removed.Click "Finish" to return to the main window.
The first time I got the license code of this Xilisoft Video Converter Ultimate was to find a 2D video to try its feature of 3D Video Conversion.
I added a video and click the "3D conversion" buttomn, then found that there are five options for different kind of 3D modes. I was confused, because I cannot understand the meaning of the options: "Anaglyph (Red/Cyan)", "Side by Side", "Side by Side (Half-Width)", "Top and Bottom" and "Top and Bottom (Half-Height)". Judging according the knowledge learnt in my high school physic class, I chose the first one: "Anaglyph (Red/Cyan)". After conversion, I got another video which looks like a shadow attached. It's interesting. I found a pair of physic glasses once used in the 3D cinema, amazing, 3D video enjoyed at home!
Sometimes the tutorial is detailed but unnecessary, we should try to explore a mush easier way. The things I like most of all is personal achievement for trying new stuff. How about you?

Nice article
ReplyDeleteKeep it up
Download xilisoft video converter
Full version on link below 👇
xilisoft video converter full version
You can follow my telegram channel for latest airdrop updates
Subscribe now you will never miss 👇
latest airdrops